Instantiating Your First App
In the first chapter of our tutorial series, we will instantiate the skeleton app in developer mode.
Requirements
Before starting, make sure to register for Sobamail, download and install the client and login to your account using the native desktop client.
For those who find an IDE makes life easier, you could do a lot worse than using Visual Studio Code to follow along with this tutorial.
Sobamail Applications
To reiterate from the concepts section, Sobamail applications, just like regular web applications, are split into two main components that work together:
- A Mutator module that handles all business logic and state changes,
- A user interface that handles all user interaction. It's a regular frontend application.
Apps need to be instantiated before they can be used. Once deployed, Sobamail applications are immutable, which would normally make app development quite impractical. That's why the Sobamail platform has two deployment modes for applications: Developer mode and Production mode.
Mutations generated by an app in developer mode are not replicated since it's impossible to guarantee convergence.
We will start by instantiating the Sobamail app skeleton in developer mode.
The Application Manager
Each Mailbox replica has its own local app manager called Application Manager. It can be used to instantiate apps in developer mode. To do this:
- Launch Sobamail
-
In the folders widget, click the
 Apps
folder, which launches the app launcher. Click the Application Manager
icon to launch it.
Apps
folder, which launches the app launcher. Click the Application Manager
icon to launch it.Prefer the folder tree?
If you expand the Apps folder instead of clicking it, you'll see the list of instantiated mailbox-wide applications. Expand the Application Manager folder and click its single entry to launch the same Application Manager GUI. That garbled text label is the instance id of the Application Manager application.
-
Click the "Instantiate In Dev Mode" button.
-
Enter your desired app id and app name. Do note that, once published, it's not possible to change the app id of a Sobamail application.
-
Click "Submit" to instantiate your app.
Note
You are supposed to use only subdomains of domain names you control as your application id.
By definition, a Sobamail user <user>@<domain.name> is given control of
the <user>.user.app.<domain.name> domain with all of its subdomains.
So if your Sobamail username is alice@example.com,
you can use e.g. tutorial1.alice.user.app.example.com as application id.
The Anatomy of a Sobamail App
Now you should see your new app instance in the Apps folder, under your given app name. Click its instance id to launch the app UI.
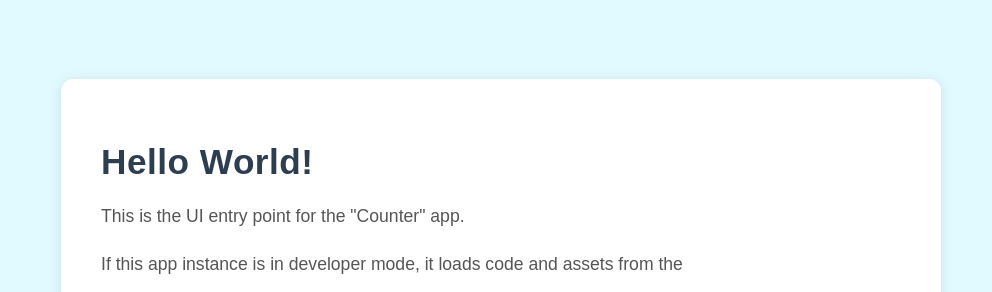
Congratulations -- you now have a running Sobamail app! What you're looking at
is the skeleton's default user interface: a plain static index.html page. It
doesn't do anything useful yet, but this shows that the full instantiate and
launch process is working.
Follow the on-screen instructions to locate the develroot -- the folder on disk that holds your dev-mode app's source code.
Once you find it, the best way to explore the develroot is to launch Visual
Studio Code and open the develroot using
File > Open Folder
Let's have a detailed look at the mutator module of the starter app before delving into implementation details:
import "soba://computer/R2"; // (1)

import { // (2)
    DeleteRow,
} from "https://sobamail.com/module/base/v1?sha224=<BASE_HASH>";

export default class Mutator { // (3)
    static id = "tutorial1.alice.user.app.example.com"; // (4)
    static name = "Application Tutorial"; // (5)
    static version = "1.0.0.0"; // (6)
    static objects = new Map([ // (7)
        [ DeleteRow.KEY, false ],
    ]);

    constructor() { // (8)
        // TODO: Create the database schema
        // TODO: Perform any sanity checks
    }

    process(message, metadata) { // (9)
        // TODO: Implement the app logic
    }
}
-
Sobamail runtime is versioned to help with convergence on all replicas. First thing to do is to choose a computer release to run your application. There is currently only one computer to choose: Replicated-2. It can be chosen by importing the magic
"soba://computer/R2"module. -
For the same reason, all modules use hash values in import statements to guarantee that the same code runs on every replica, from the root module down to the last leaf of the import tree. We write the digest as a placeholder (
<BASE_HASH>) throughout these docs; your generated skeleton already contains the real value, so there's nothing to type here.Why these docs don't print a literal hash
A module's digest changes whenever its source changes, so any value pasted into the docs would eventually go stale. In developer mode the hash isn't verified anyway (all comparisons pass), so the skeleton's value works as-is. The exact digest only matters at deployment: at that point you compute hashes with standard tools or the gen-hash.py script, and the current base-module digests live in the sobamail/base repository. See Imports for the accepted formats (urlsafe base64, base32hex, or hex; currently SHA224 only).
-
All root modules must contain a default exported class.
-
The default class must have a static
idvariable of typeString. -
The default class must have a static
namevariable of typeString. -
The default class must have a static
versionvariable of typeString. -
The default class must have a static
objectsvariable of typeMap<String, Boolean>. Since an app that doesn't react to any object at all would not be useful, the Map object can not be empty.-
The map key is a string of format
"{Namespace}Name". See Events for details. -
The map value is a boolean whose value must be
false.
-
-
In Sobamail, events get processed in two stages: First, the Mutator class is instantiated by the JS runtime. This runs the constructor where the user defines the app schema and performs various sanity checks. The constructor must throw an
Errorinstance if the application environment can not be validated. -
After the runtime obtains a fresh Mutator instance, it invokes the
processmethod with two arguments:message: The message object that triggered the eventmetadata: Contains metadata about the processing environment and the provenance of the event at hand.
If the
process()method doesn't throw, the event is considered to be processed successfully.The return value of the
process()method is discarded.
Implementation
From here on you may want to follow tutorials on different types of applications.
The counter tutorial demonstrates a collaborative web application with an increment-only counter.
Inspecting the Frontend
Optional -- handy once you have your own frontend
There's nothing to debug in the static starter UI yet, but once you start writing real frontend code (e.g. in the counter tutorial) you may want a debugger. Come back to this section when you do.
Since Sobamail uses Chromium under the hood, you can use the Inspect tool from the Chromium project to connect to it.
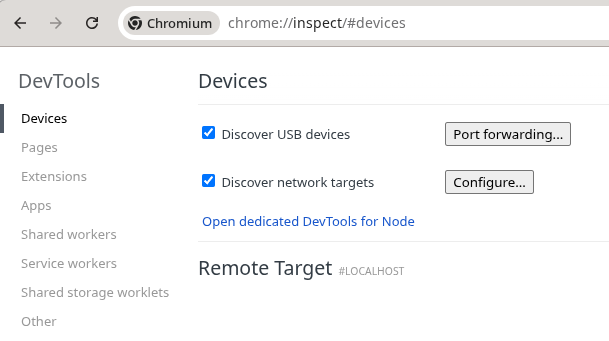
To do this, launch your system Chrome/Chromium and navigate to
chrome://inspect, then click "Devices".
You should now be facing a screen similar to this:
Click the "Configure" button next to the "Discover network targets" checkbox:
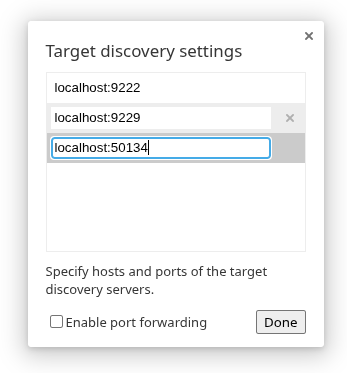
...and enter the localhost:50134 (50134 for SOBA) address.
Now you should see the tabs open in Sobamail. Find the tab for our application and click "inspect".
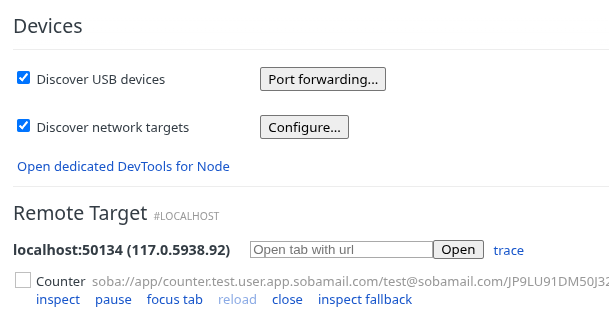
Now you can use the good old Chromium debugger to inspect Sobamail frontend apps.